Creating a Highly Available Kubernetes Cluster
Goal
We are trying to create a Highly Available(HA) Kubernetes Cluster using the official documentation: Creating Highly Available Clusters with kubeadm. We are using the stacked etcd topology for our HA kubernetes cluster creation.
About
High Availability (HA) is the ability of a system to operate continuously for a designated period of time even if the components within the system fail.
There was this interesting medium article mentioning different types of kubernetes clusters: Types of clusters
A high availability (HA) cluster is a multi-node cluster with redundancy and failover mechanisms in place to ensure continuous availability and minimal downtime. We need to have an odd number of control plane nodes for better leader election, where in our case we are using 3 VMs as control plane nodes.
Prerequisites of the stacked etcd topology:
Three or more machines that meet kubeadm's minimum requirements for the control-plane nodes. Having an odd number of control plane nodes can help with leader selection in the case of machine or zone failure.
- including a container runtime, already set up and working
Three or more machines that meet kubeadm's minimum requirements for the workers
- including a container runtime, already set up and working
Full network connectivity between all machines in the cluster (public or private network)
Superuser privileges on all machines using sudo
- You can use a different tool; this guide uses sudo in the examples.
SSH access from one device to all nodes in the system
kubeadm and kubelet already installed on all machines.

Procedure
Configuring the nodes for kubeadm bootstrapping
kubeadm, by default takes ipv4 addresses. They enabled dual-stack ipv4/ipv6 usage from kubernetes 1.20 version, as we are using 1.28.10 kubernetes version we can use ipv6 addresses.
Keeping in view of the problems faced when we are creating the kubernetes cluster using ipv6.
- Change the /etc/default/kubelet configuration to include the ipv6 internal node ip address.
1
  KUBELET_EXTRA_ARGS=--pod-infra-container-image=registry.k8s.io/pause:3.9 --node-ip=<ipv6 address>
- Add the DNS record for the VIP address on the control-plane nodes
1
2
3
4
  127.0.0.1      localhost localhost.local
  127.0.1.1      <some-name(hostname possibly)(optional)>
  ::1            localhost ip6-localhost ip6-loopback
  <vip address> kube-api-server
- Make sure we have the required images already loaded into crictl required for the kubernetes pods to run networking, kube-vip by running:
1
  sudo crictl images
- If not run:
1
 sudo crictl pull <image>
- By adding proxy if needed(optional):
1
2
3
  sudo systemctl set-environment HTTP_PROXY=<http proxy address>
  sudo systemctl set-environment HTTPS_PROXY=<https proxy address>
  sudo systemctl restart containerd.service
- and remove these changes by running:
1
2
3
  sudo systemctl unset-environment HTTPS_PROXY
  sudo systemctl unset-environment HTTP_PROXY
  sudo systemctl restart containerd
Creating a Load Balancer for kube-apiserver using kube-vip
We need to have a load balancer ready for the kube-apiserver with a name that resolves to DNS. This load balancer distributes traffic to all healthy control plane nodes in its target list. As per the official documentation we have several Options for software load balancing:
- keepalived and haproxy
- kube-vip
I am using kube-vip, because it can be ran as a static pod on each and every control plane node, without us having to setup external VM or pods for the haproxy(load balancing) and keepalived(Virtual IP Management).
As per kube-vip official documentation:
Static Pods are Kubernetes Pods that are run by the kubelet on a single node and are not managed by the Kubernetes cluster itself. This means that whilst the Pod can appear within Kubernetes, it can't make use of a variety of Kubernetes functionality (such as the Kubernetes token or ConfigMap resources). The static Pod approach is primarily required for kubeadm as this is due to the sequence of actions performed by kubeadm. Ideally, we want kube-vip to be part of the Kubernetes cluster, but for various bits of functionality we also need kube-vip to provide a HA virtual IP as part of the installation.
The sequence of events for building a highly available Kubernetes cluster with kubeadm and kube-vip are as follows:
Generate a kube-vip manifest in the static Pods manifest directory.
- Set the VIP address to be used for the control plane
1
  export VIP=<VIP ADDRESS>
- set the INTERFACE name to the name of the interface on the control plane(s) which will announce the VIP. In many Linux distributions this can be found with the ip a command.
1
  export INTERFACE=ens160
- Get the latest version of the kube-vip release by parsing the GitHub API. This step requires that jq and curl are installed.
1
  KVVERSION=$(curl -sL https://api.github.com/repos/kube-vip/kube-vip/releases | jq -r ".[0].name")
- Create a kube-vip command using the container run-time which is containerd in our case
1
  alias kube-vip="sudo ctr image pull ghcr.io/kube-vip/kube-vip:$KVVERSION; sudo ctr run --rm --net-host ghcr.io/kube-vip/kube-vip:$KVVERSION vip /kube-vip"
- Create a manifest for kube-vip to ARP
1
  kube-vip manifest pod --interface $INTERFACE --address $VIP --controlplane --services --arp --leaderElection | sudo tee /etc/kubernetes/manifests/kube-vip.yaml
Run kubeadm init with the –control-plane-endpoint flag using the VIP address provided when generating the static Pod manifest.
The kubelet will parse and execute all manifests, including the kube-vip manifest generated in step one and the other control plane components including kube-apiserver.
kube-vip starts and advertises the VIP address.
The kubelet on this first control plane will connect to the VIP advertised in the previous step.
kubeadm init finishes successfully on the first control plane.
Using the output from the kubeadm init command on the first control plane, run the kubeadm join command on the remainder of the control planes.
Copy the generated kube-vip manifest to the remainder of the control planes and place in their static Pods manifest directory (default of /etc/kubernetes/manifests/).
Initializing the first control-plane node
Execute the kubeadm init command:
1
  sudo kubeadm init --control-plane-endpoint kube-api-server --apiserver-advertise-address <vm internal ipv6 address> --pod-network-cidr=fd98::/64 --service-cidr=fd99::/108 --kubernetes-version=v1.28.10 --upload-certs --v=5
Execute these commands to run kubectl commands as regular user:
1
2
3
  mkdir -p $HOME/.kube
  yes | sudo cp -i /etc/kubernetes/admin.conf $HOME/.kube/config
  sudo chown $(id -u):$(id -g) $HOME/.kube/config
Join the other worker and master nodes
Copy the join commands from the above step and execute them on the respective nodes, don’t forget to copy the kube-vip.yaml from the first control-plane to other control-plane and make sure they are present in the /etc/kubernetes/manifests folder of other control-plane nodes
kubeadm join command for control-plane node as of type:
1
2
  sudo kubeadm join kube-api-server:6443 --token <token> --discovery-token-ca-cert-hash <sha256-hash>  --control-plane --certificate-key <certificate-key> --apiserver-advertise-address
<vm internal ipv6 address>
Don’t forget to add the apiserver-advertise-address when joining a control-plane, cause if not mentioned, it will take 10.0.0.2 or some other ipv4 address as default and will not be able to join the cluster.
kubeadm join command for worker-node as of type:
1
sudo kubeadm join kube-api-server:6443 --token <token> --discovery-token-ca-cert-hash <sha256-hash>
Apply kubernetes networking
Download the flannel.yaml from the flannel-io/flannel github repository on to a master node and apply required changes for the interface and ipv6 networking
Change-1:
Enable ipv6 networking by changing/adding these lines in configMap
1
2
3
4
5
6
7
8
9
  net-conf.json: |
    {
      "EnableIPv4": false,
      "EnableIPv6": true,
      "IPv6Network": "fd98::/16",
      "Backend": {
        "Type": "vxlan"
      }
    }
Change-2:
Add the interface for the networking, we are using the enp6s0 because of the internal ip networking of the VM, in the daemonset spec container args
1
  - --iface=enp6s0
Apply:
Apply the flannel.yaml after the changes using the command:
1
  kubectl apply -f flannel.yaml
Patch the nodes for podCIDR
Execute the command:
1
kubectl patch node <node-name> -p '{"spec":{"podCIDR":"fd98::/64"}}'
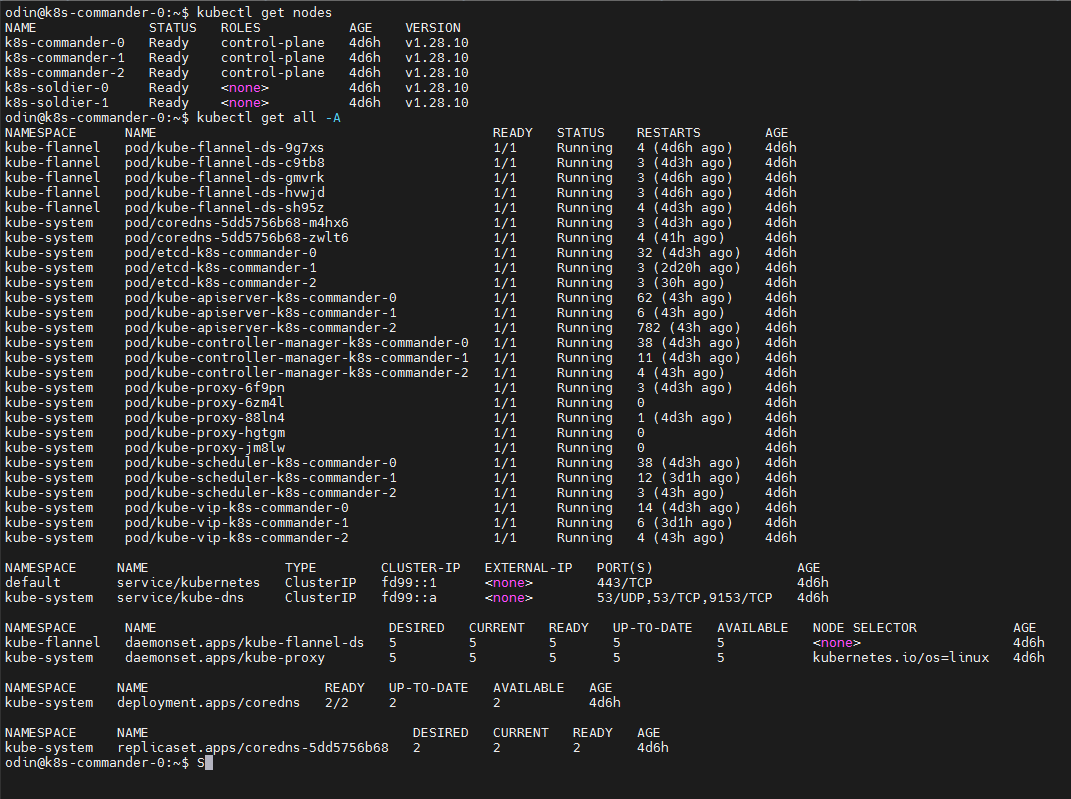
After successfully implementation:
References/Issues informative pages: